It’s little league ALL STAR mania. We made some star message cookies, baseballs, and sugared stars for an awesome baseball team. There’s nothing better than two all American favorites…baseball and eating! Enjoy.

That’s how we responded when we were asked to bake some special cookies for a Phineas & Ferb themed birthday party. After a quick refresh on the specifics of the dynamic duo’s semi-aquatic friend, Perry the Platypus, we got to work! See some shots from our hours of fun below!
Here’s looking at you – eyes with black piping.
 Then moving on to Perry’s handsome bill – also piping consistency. We used a true orange color for the outline of the beak and a more goldenrod yellow for the flooding fill in the beak.

Time to fill in the whites of the eyes…we used a white flooding consistency.


Time for the finishing teal color. We used a flooding consistency. First, we outline the square cookie, then flood, and use a toothpick to fill in the details! Now, he just needs to dry!

Finished product…

It’s high school graduation time and you know your getting older when your friends have kids graduating from high school! We wanted to celebrate high school graduation with cookies that recognized their accomplishments and most importantly…getting into a good college. We made message cookies, graduation caps, confetti, stars, and even some logos paying tribute to their future alma maters. Here’s a peak at the fun!
First, for a Carlsbad High grad going to UCLA to play water polo! We love the UCLA colors. First time we made water polo balls.
Next up….the Wildcats. This message was “Now You’re A Wildcat.” Wishing Carly good luck at the University of Arizona.

Of course, we had to make some cookies for her mom too!

Another grad on the east coast is headed to Endicott College in MA. These were some fun logo cookies. I thought this was a pretty awesome looking platter! The sea gull mascot was fun to do. The message for these cookies was “Watch Out Endicott”.

Wishing all the high school graduates the best of luck in college! Congrats on getting into some great schools.
We made these adorable flower pots for our kids teachers! I love the bright colors. Enjoy the “You Help Me Bloom” Theme!

The flower cookies were put onto lollipop sticks. I cut the cookie shape out of the dough and then press the stick into the back side and put a little extra dough over the top. Then bake them with the sticks!
To decorate them, first do the sugared middle..or else the sugar will stick to the other parts! Make a small circle with white frosting (I used a loose piping consistency). Then dip into the sugar crystals. I used orange here.

After you dip the cookie in the sugar, then you pipe the flower pedals and fill them in with the royal icing. I used a think flooding consistency so I could outline and fill at the same time. Warning…be careful because it will spread a little and you don’t want it to drip over the edges of the flower. If you are not confident, then pipe first and then fill the pedals!

Here are some of the finished pops….I couldn’t decide which colors to use to I made some white and outlined in pink which I thought looked great!

After they dried overnight…I made two bouquets and wrapped the rest in bags with toole. I wrap each cookie in a cellophane bag with a ribbon and then pushed each pop into a container with foam! Here are the finished arrangements! I love the way the message cookie brings the theme together.


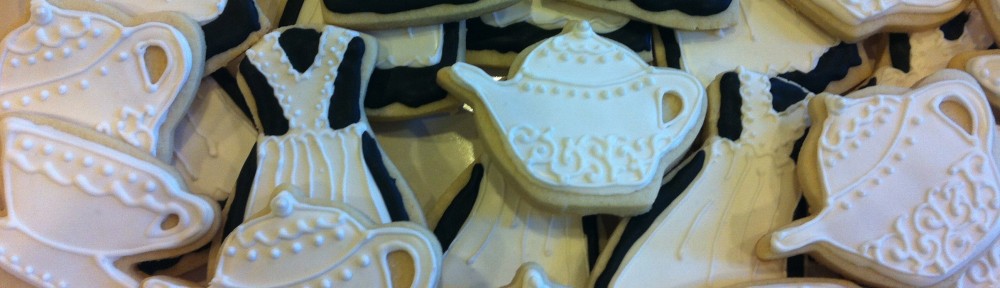
For the last several months, my girls have been fortunate enough to be part of a stellar group of youth singers and dancers, choreographed and trained by the lovely director and producers of the Coast Kids Theatre Group in Roger & Hammerstein’s, “Cinderella”! Cast predominantly as mice, the girls had so much fun learning their parts and participating as the whole production came together like clockwork.
So, as time marched on towards the opening weekend, we were first excited to donate a couple dozen glass slipper cookies to the very special matinee performance, which included, “Tea with Cinderella”, oh what fun! While delivering the cookies, so many of the talented players asked with wide, hopeful eyes, “Are those for us?” … A question that only lead to a greater one? Could we pull it off? Add another 100 cookies to our already busy, busy docket?
The answer was a yes (mostly because Elaine, baked all of the cookies in one day while I had an extra volunteer thing at the kids’ school (not to mention tech night rehearsals, if only there was an oven at the Star Theatre)) … But all jokes aside, and in the spirit of those fastidious mice, by the time the icing and chunky sugar had dried on the very last glass slipper cookie, we truly felt an awful lot like Cinderella’s dear friends – “Work, work, work, she’ll never get her dress done on time,” – but luckily we did, and the payoff was worth it, both casts of the production really enjoyed their special glass slipper cookie treats, individually wrapped to boot, and that’s a wrap! – April


When my friend Tammie approached us about making cookies for a fashion show at her dance store, KC Dance Gear (along with an invitation for my girls to model), we were delighted to come up with some fun ideas for her special event! We started with a message cookies outlining the treats with her logo colors – we absolutely fell in love with the “Fashion Star” stars – so appropriate here, especially when paired with our little red chunky sugared stars. Click through to her lovely store here: http://www.kcdancegear.com/ Congratulations, Tammie on a successful show! – Elaine

It’s that time of year at Carrillo Elementary …Teacher Appreciation Week! So what are you doing for your kids teachers? Of course, we are baking cookies. We thought about the traditional apples, rulers, crayons, but then, how could we resist the opportunity to do something little more personal and unique (as well as a good excuse to use some new cookie cutters)!
So, for my daughter’s first grade teacher – who loves sports and used to be a PE teacher – we went with a sports theme, the special message inscribed: “YOU’RE A HOME RUN” paired with some baseball gloves, balls, and bats. Mrs. Sherwood loved them!

My older daughter’s third grade class just finished a unit on the solar system, so we we took the everyday, universal, “thank you” to a whole new level … our overall message: “Thank you for helping us reach for the stars!” The message cookie says, “Thank You Ms. Shultz”. We made a moon, shooting star, and some mini sugared star cookies!

Our school also has a Mandarin language program for third graders…so here are some cute “Mandarin Orange” slices for our special teacher!! How cute?!
")
Hope you find something fun to give to your teachers this week. Thanks to all the teachers out there who give so much to our children.
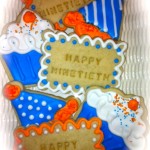
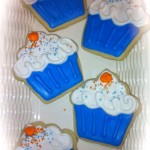
Ninety…such a milestone! We made “Happy Ninetieth” birthday cookies for a dear friend’s father. We kept it simple with birthday cupcakes, hats and message cookies. I can’t quite imagine being ninety. I think of all things he has lived through from the great depression, WWII, and records to CDs, and land lines to cell phones! I’ve heard he does use an iPad! I wonder what our kids will say when we are 90….they better at least bake us some cookies!

While at the park, we didn’t see any “stingrays”, but we did spy these curious flower pods. At first, the girls decided they looked like “butterfly or fairy wings” and planned to draw pictures of fairies, paint the wings and then glue them to their scenes. Once at home though, they turned the “wings” around and instantly shouted together, “They’re hummingbirds!” and got to painting them with a variety of acrylic paints I set out for them.


 Once the birds were painted, they got to work on their landscapes. I used thick construction paper for this and let them paint several layers of acrylic on it, intended to make a nice, robust surface upon which to glue their birds later. See their handiwork below.


And after many years of making this Passover treat, we think you might agree that there’s nothing like (or wrong) with covering matzos with browned butter and sugar to make a caramelized sauce and then, as if that wasn’t enough, adding dark chocolate chips to melt and spread upon them. Here’s the basics of what we did:
Ingredients:
5-6 whole matzos
1 stick of butter
1 cup of brown sugar
1 cup semi-sweet chocolate chips
Method:
 In a small saucepan, melt butter and sugar and slowly bring to a boil over medium heat


… if you can wait that long! If there’s one thing we learned about these matzos, it’s impossible to eat just one piece, in fact, the recipe is so easy to follow, we always make double batches (some for what we like to call, “home consumption”) and some for our Seders and snacks during Passover. Enjoy!

